ClevGuard Support: Monitor Devices with Others' Permission.
A recent US study shows mobile phone companies selling real-time user location knowledge to data brokers. Data brokers might sell your location data to law enforcement authorities and other groups, so why should you disclose it? Potential thieves acquire your daily itinerary by "checking in" at spots. Today we will discuss how to hide location on iPhone.
How to hide your location on iPhone
The Best Way to Hide My Location on iPhone
Many individuals are far more concerned regarding personal privacy. You may want to spend little time apart from colleagues and families and don't want anyone to knowing where you are by using the Find My Friends application. If you're not meant to be there, such as at school or a job, hiding your location might be useful. You can hide the location iPhone for general reasons. In this article, we'll explain how to hide your iPhone's location through various methods.
Part 1 Fake Your Location if You Don’t Turn off Location Directly
Way 1: Fake Your Location if You Don’t Turn off Location Directly
ClevGo is a tool that millions of people use extensively that enables you to fake iPhone's GPS to anywhere you want. Let's go through how you can use it to spoof the iPhone's GPS into thinking you're somewhere else.
Step 1: Connect iPhone to the PC/Mac
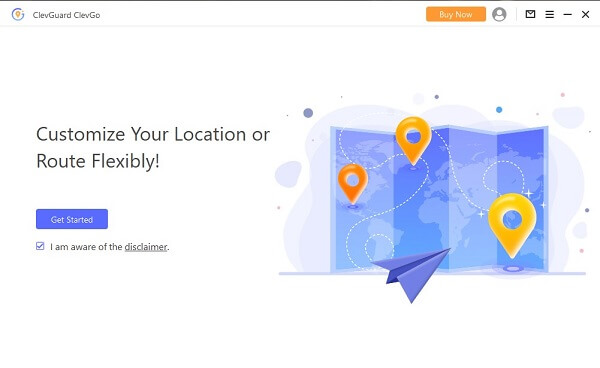
Download and install the ClevGo. Connect on your Windows or Mac computer. Select the Get Started option.
Step 2: Select Teleport Mode
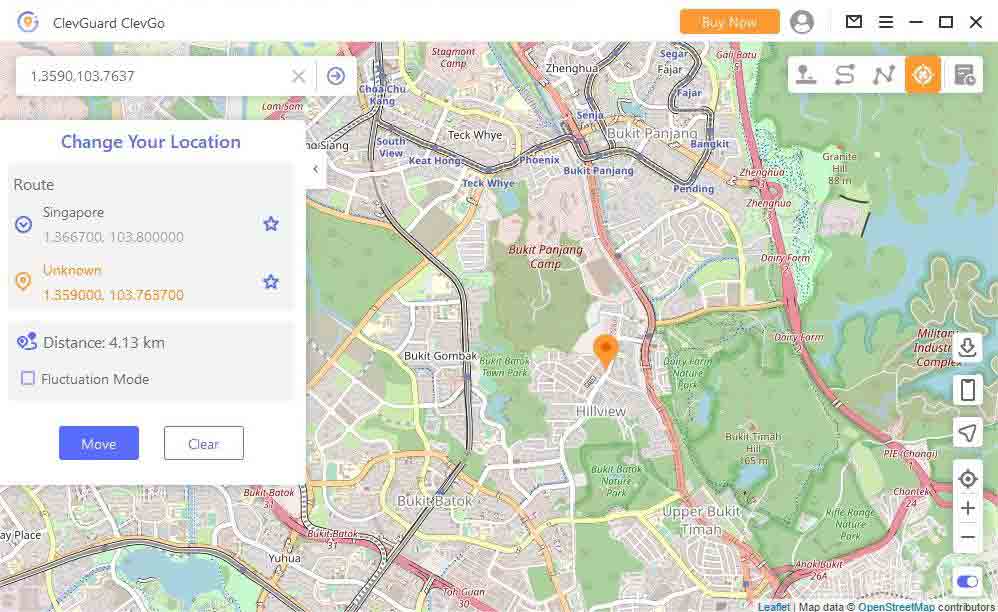
Select the Teleport Mode icon, which may be found in the top-right area of the screen. After that, you can either type in an address or zoom in and move the map around to get to your desired spot.
Step 3: Change your location
To modify your position on the iPhone, choose the "Move" option. After that, you may check the new location of your iPhone by opening any app that relies on its location, and you will notice that it has been updated.

When you employ this strategy, you won't have to worry about tracking your location. Apple won't be able to identify you using this way anymore. You are secured! And it is now your time. Click the button below to obtain, configure, and begin your independence adventure with ClevGo right now!
Download for WindowsDownload for Mac
Way 2: Change a New Location by a VPN
If you don't get access to a computer, try the simpler strategy of impersonating yourself on a new location. This would need the installation of a VPN on your iPhone.
Step 1: Pick a VPN service provider, such as Private Internet Access or Express VPN, and install the corresponding app on your device. Here we will discuss NordVPN.
Step 2: Once the installation is complete, the VPN will inquire about your permission, and you need to grant it. After that, the VPN will be set up instantly.
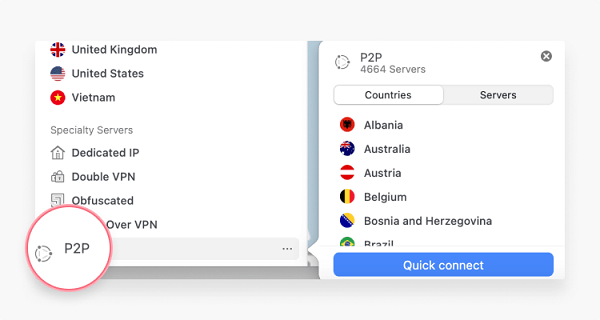
Step 3: Link the app to your preferences by clicking the "Quick Connect" button. After that, you should give the program permission to add the settings. While the header appears green, it indicates that you have connected properly to the selected server and can now fake your location when using Find My Friends.
It has been noted that utilizing a VPN poses various security hazards. It may occasionally result in data breaches, dodgy privacy practices, malware attacks, and other problems.
For those with important data on their device, we recommend using ClevGo to Hide Your Location on your iPhone.
Part 2 Stop Sharing Location from "Setting"
You may disable location sharing on your iPhone by going into Settings. Suppose you need access to another device that you can use to conceal your whereabouts from Find My Friends and iMessage. If this is the case, then your only choice is to turn off location sharing on your iOS device.
Way 1: Turn off iPhone Precise Location
By employing this, your friends and family will not be informed that you have disabled location sharing, and as a result, they will not be able to see you anywhere on their devices. This is the procedure for how to hide my location on my iPhone
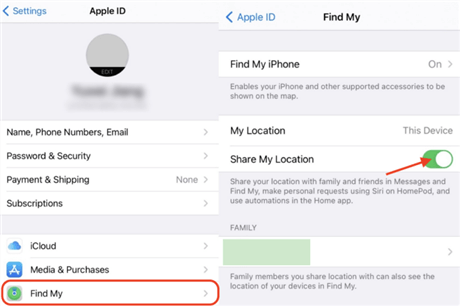
Step 1: After turning on your iPhone, go to the Settings app and press your name toward the top of the screen.
Step 2: Select "Find My" from the menu.
Step 3: Deactivate the option to "Share My Location."
Way 2: Disable Location Services For the Apps
One other method for concealing your position on an iPhone is to disable location access for certain applications. The procedure is as follows.
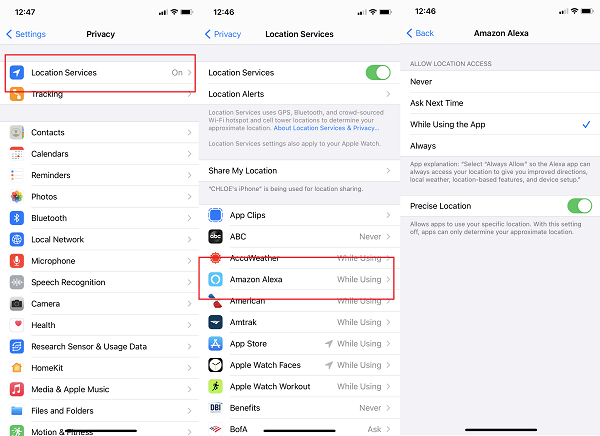
Step 1: Go to "setting" on your App and navigate to the "Privacy" tab.
Step 2: Select the "Location Services" option and ensure it is turned on.
Step 3: Scrolling down the page, you will see a list of applications. Choose the app for which you want to restrict access to your location data.
Step 4: You will see four different choices, which are as follows: Never, Always inquire the Following Time when you use the software. Pick one of them that best fits your requirements.
Way 3: Turn off "Significant Locations"
Turning off location access for certain applications is another way to conceal your iPhone's whereabouts. Here's how to hide location on iPhone without them knowing.
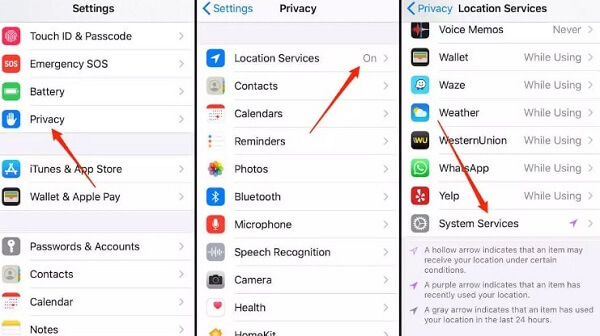
The iPhone's extensive and profound settings choices enable you to fine-tune your settings. Furthermore, you may access and conceal location using System Services, as seen below.
Way 4: Stop Sharing Location on Find My Phone
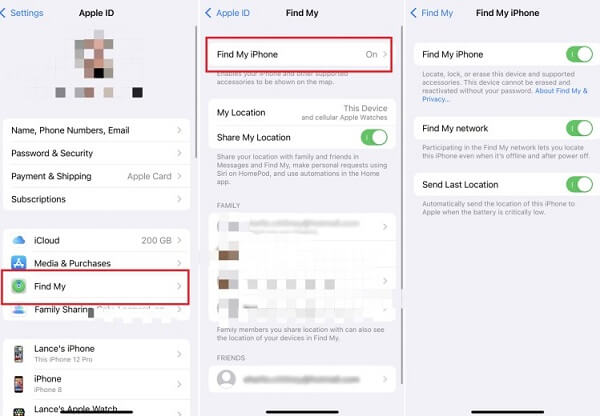
You may also conceal your whereabouts on your iPhone by turning off location sharing in the Find My App. This is another option with a simple setting:
Select "Me" at the display's bottom right corner, and then deactivate the "Share My Location" button by tapping on it.
Way 5: Hide Your Location on your iPhone By Activating the Airplane Mode
When you put your iPhone into "Airplane Mode," the GPS function may also be turned off. However, this will not impact offline applications that rely on Location Services. For instance, even if there is no internet connection, the offline map should still be able to function properly. Take the following steps on your iPhone to turn on airplane mode
Step 1: To access the Control Center on your iPhone, pull up from the bottom of the screen in the direction of the arrow. If you're using an iPhone X, scroll down from the top right corner of the screen.
Step 2: Tap the symbol that looks like an airplane.
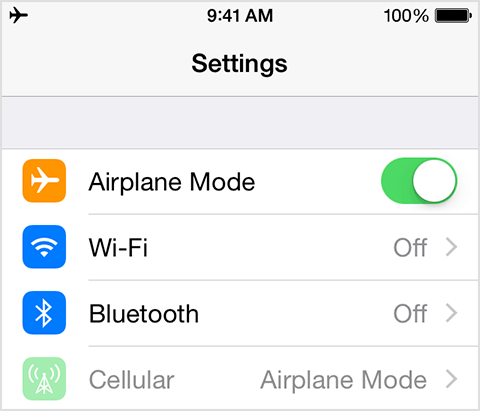
If you use this approach, however, you will be unable to conduct phone calls or even connect to Wi-Fi to surf the net. This limitation applies even if you only want to check your email.
Part 3 Not Leaking Location Physically: Share location with another device
If you prefer to conceal your position from Find my App and iMessage monitoring, you may do so by sharing from a stationary iOS device. This strategy might lead people to believe that you are not traveling whatsoever.
They will see a location, but not your precise position if they check your whereabouts via Find my App or iMessage monitoring. This is the procedure to follow:
Step 1: Go to the Settings app on the second iOS device.
Step 2: Choose your name from the menu at the very highest point of the screen.
Step 1: selecting "Find My," go to the next screen and hit the option labeled "Use This iPhone as My GPS."
Extra Tips: How to Protect your Location Privacy?
In addition to the procedures that we have described above, there are a great number of alternative approaches that may be used to accomplish the same goal.
- You may conceal the position of your iPhone, for instance, by turning it off. As a result, it will be absolutely impossible for anyone to keep track of your whereabouts.
- You may turn off your location, which will help hide your location on your iPhone.
- You may Hide Your Location on the Messages App.
Conclusion
Whenever you want to
fake your location
without having to jailbreak your cellphone, one of the reliable applications to utilize is ClevGo. All that is required is to download the application. In addition, the software is simple to use and can spoof locations on the majority of applications available for iOS, such as Pokemon Go and fitness apps. It's a great all-around software that's compatible with the vast majority of iOS versions and devices. The fact that the software cannot be downloaded for free and must instead be paid for regularly is the only shortcoming we can identify with. You may also use the free trial period to see whether the product suits your needs.


